
A Complete Guide to No Fusion
If you’re like me, you’ve never been really happy with the images that come right out of the iPhone, specifically for anything photography related. Snapshot images or memories? It handles those swimmingly - they just have that “phone” look, typically associated with overly sharp images where dark and bright areas look too crushed. You can bypass this by shooting in a raw format, but that’ll also require you to edit those images in something like Lightroom, even if it’s just to apply a preset.
I figured there had to be a better solution out there, thus a few months ago I spent a lot of time trialing different apps on the iPhone to see if something existed that allowed me to shoot pleasing images without any editing required. From that research, I discovered my current favorite solution, an app called No Fusion. In this article I want to go over the best ways to use the app and deep dive into what makes it great.
The best part about this app, in my opinion, is that you can use it without doing basically any setup and still yield great results. Thus the structure for this article will start simple and escalate to deeper understanding of just how much you can accomplish within the app.
note - I have zero affiliation with No Fusion. I am using the paid version for this tutorial, thus there may be features I discuss or feature that are not unlocked for you if you are using the unpaid version.
The Interface
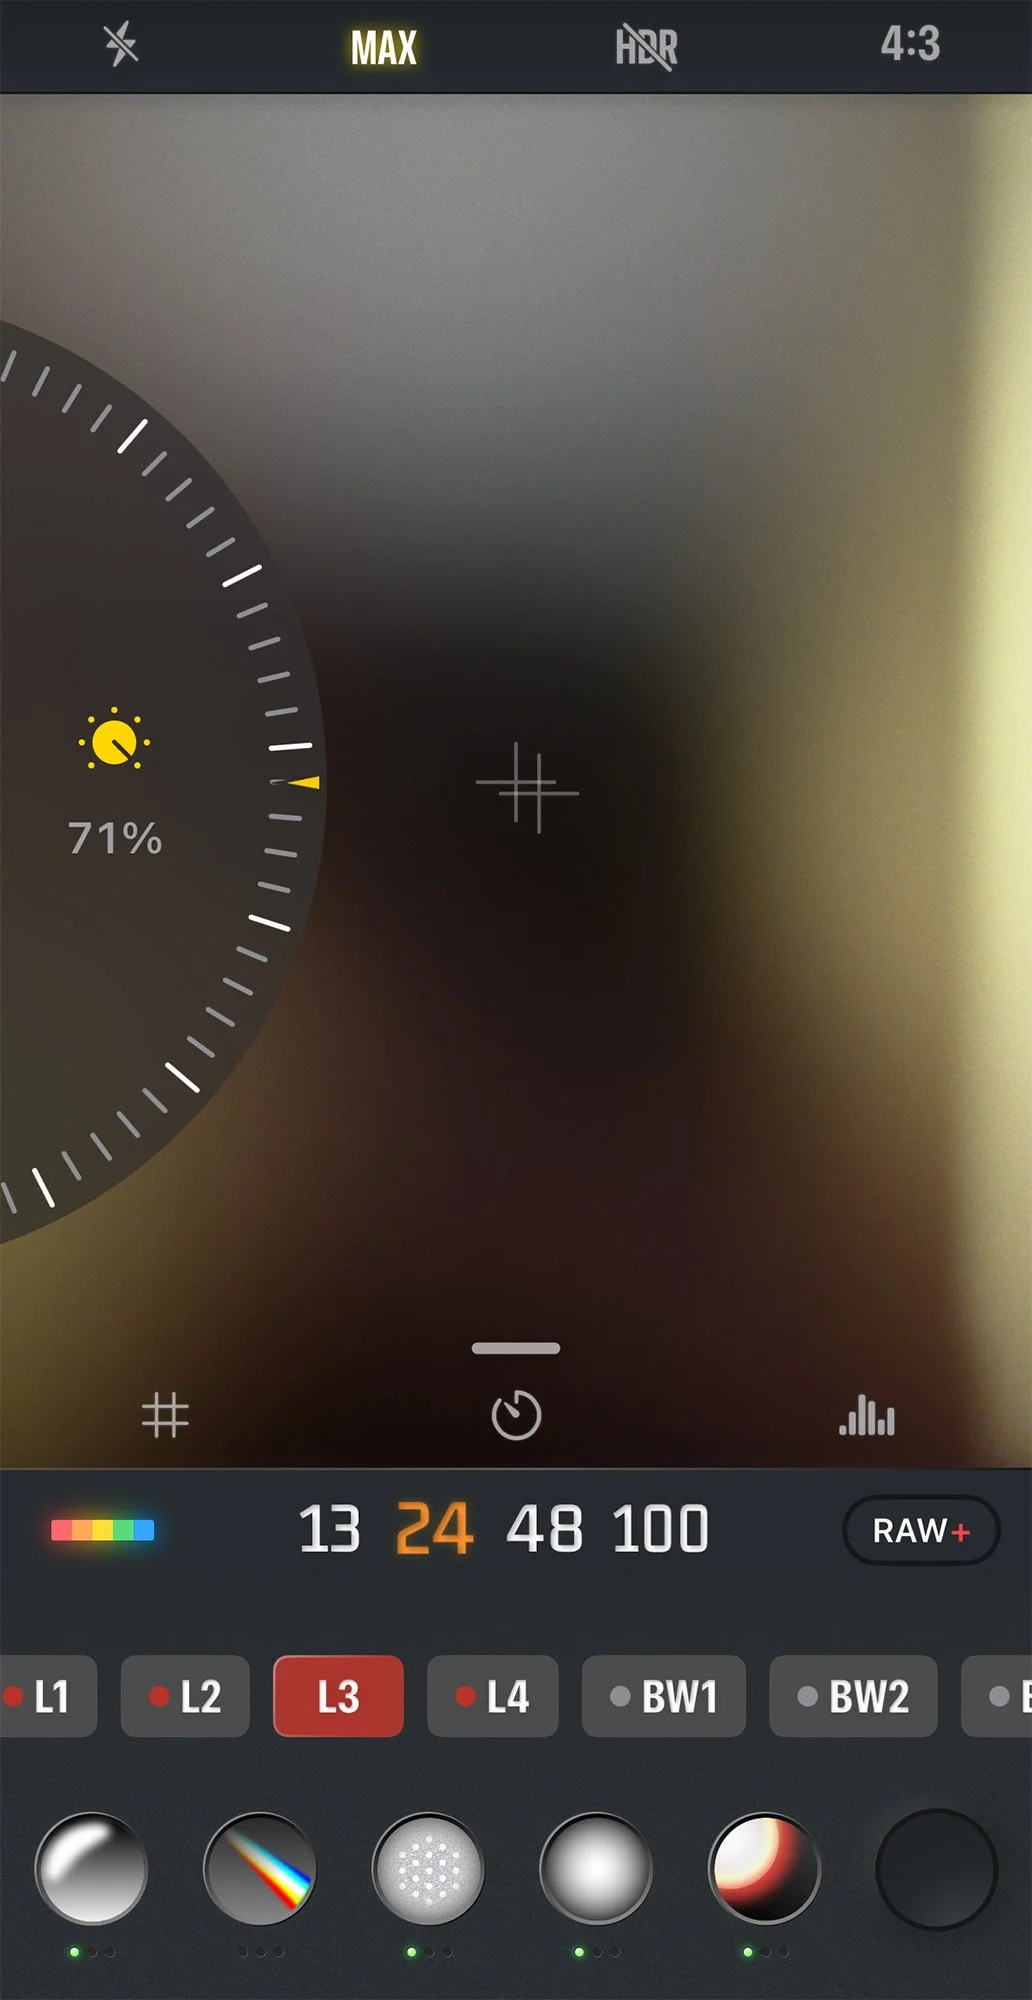
When you first open the app, you should see something similar to what you see below. You can customize the look of the interface in both theme and function. Changing the theme is only aesthetic and you can do that by pressing the setting icon > theme selection. Mine is set to the default.
You can customize your interface by pressing the setting icon > Edit Function Buttons. This allows you to add, remove, or move all the different settings that No Fusion gives access too such as the histogram, image ratio, or the self timer. I believe I have mine still set to the default (but honestly don’t remember). Also if you cannot see the 3 bottom icons in the viewfinder window (Grid/Timer/Histogram), simply tap the “UP” Arrow and they should appear.
Lets quickly cover what each setting does starting from the top left:
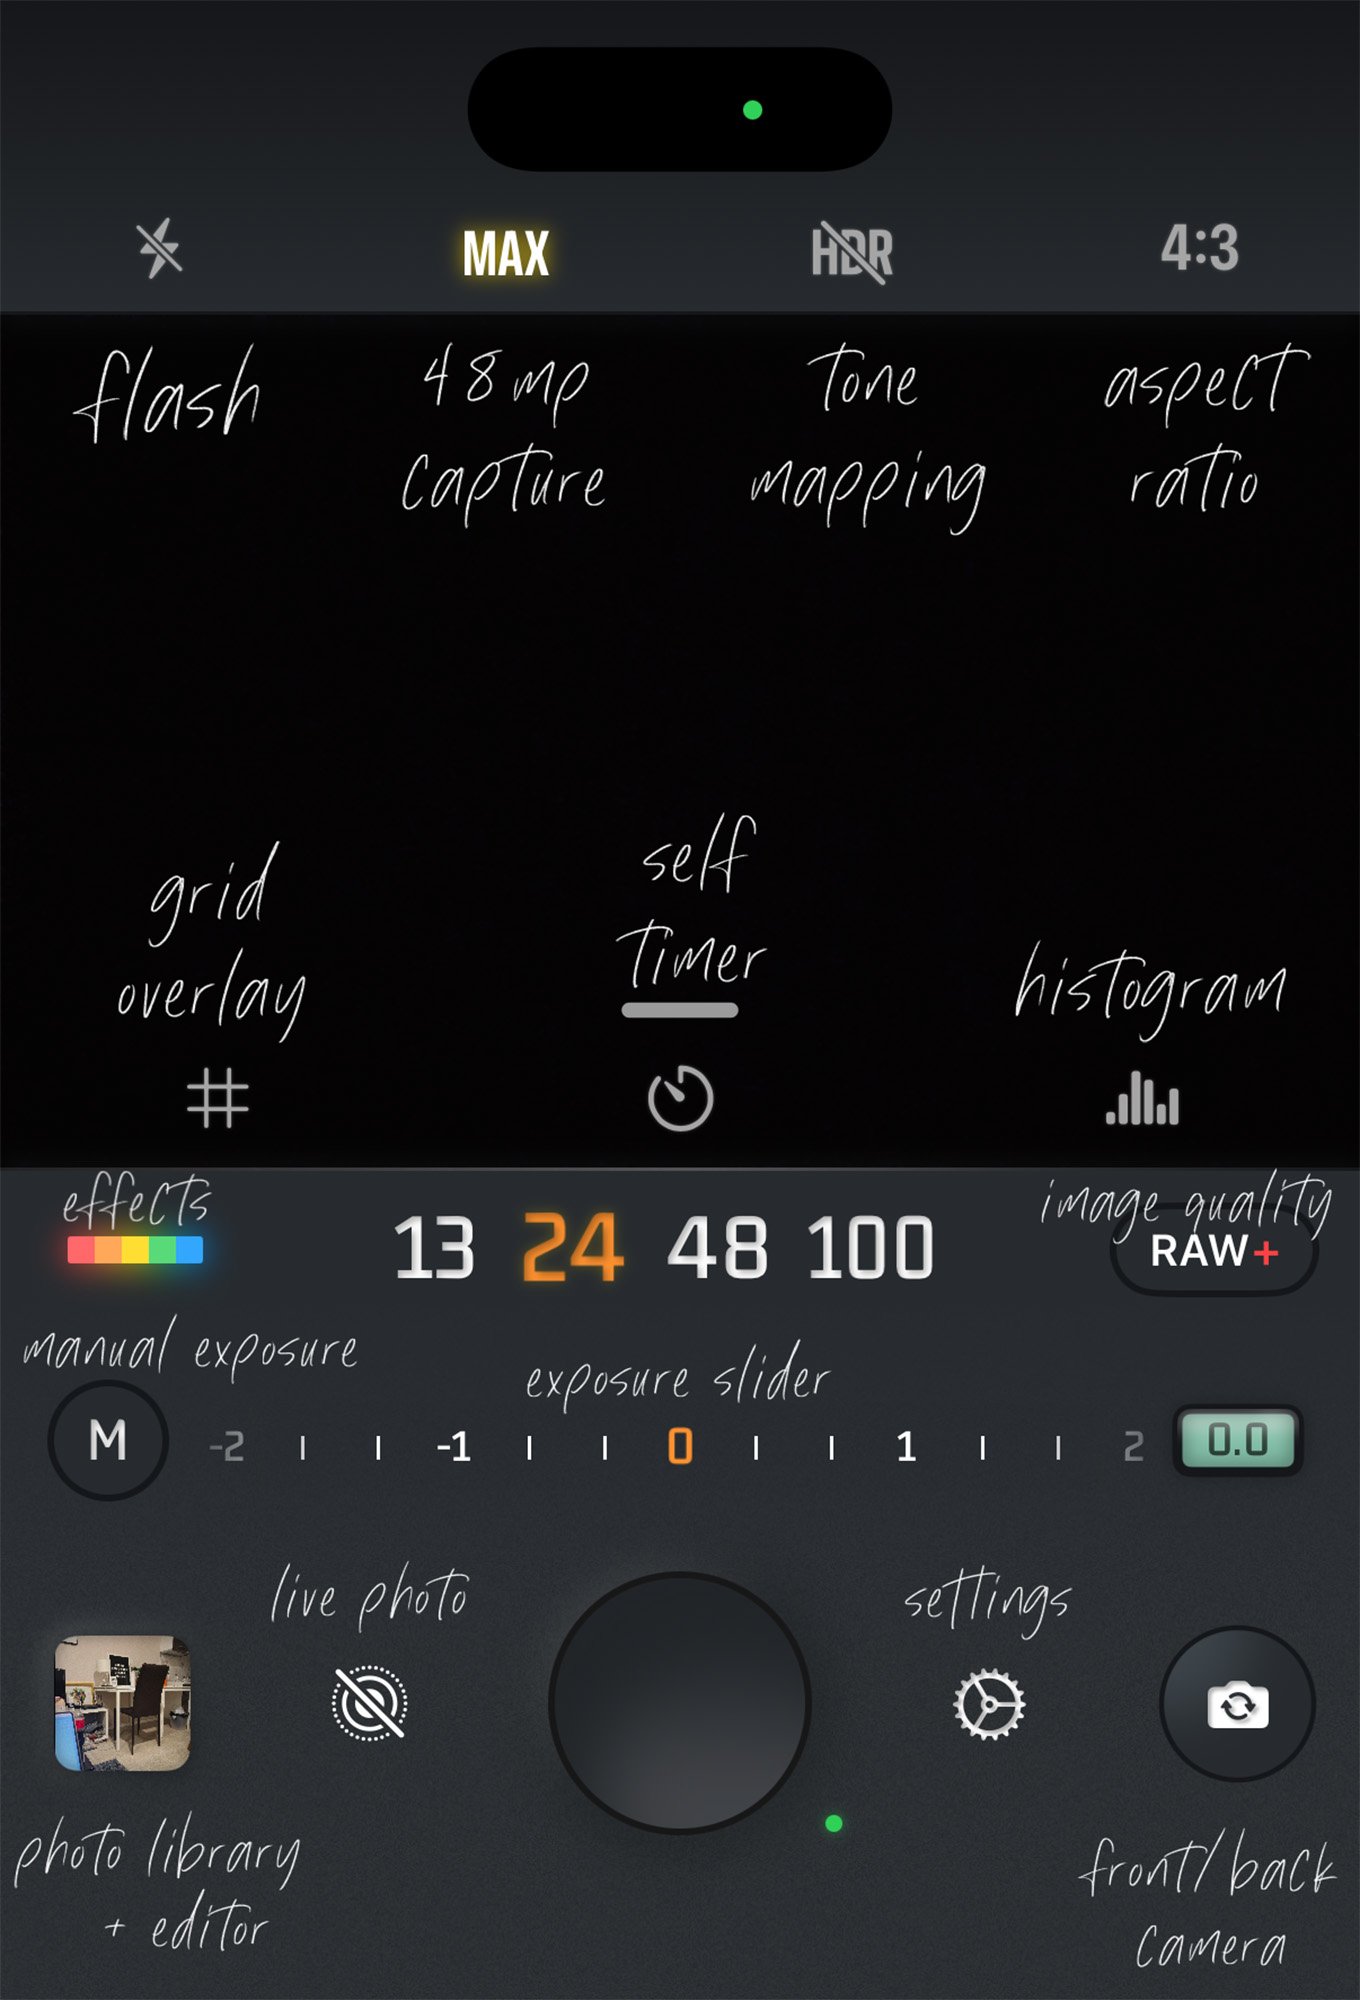
Lighting Icon - Enables/Disables flash
MAX - Enables 48mp Images (In both RAW and HEIF), only works with ProRAW Pipeline enabled (more on this later)
HDR - Enables/Disables if the image you take will display in HDR/Tone-Mapped mode. Doesn’t change anything about the image, simply if it will display as HDR or SDR.
4:3 (Aspect Ratio) - iPhone’s default image ratio and largest capture is in 4:3.
Grid - Enables/Disables Grid Overlay
Self Timer - Enable/Disable a 3s or 10s timer
Histogram - Enables/Disables a Histogram
Rainbow Icon (Effects) - Brings up Effects & Filters Menu. More on this in it’s dedicated section.
Camera Lens Selector (13, 24, 48, 100) - These are the different camera focal lengths your phone has access too. These will be different for most models of phone, for example if you’re on an iPhone 16 Pro you will have a 120mm instead of 100.
RAW/HEIF Icon - This adjusts what types of images you’ll take and their quality. More on this in it’s dedicated section
M for “Manual” Controls - Brings up manual controls for exposure
Exposure Slider - Adjusts Exposure Value (double tap to reset)
Photo Library - Brings up your photo library and is also where you can edit raws or negatives.
Live Photo Icon - No Fusion is one of the only apps I’ve found that shoot high resolution images while also recording live photos. Note that when you first download no fusion and it asks for access to your microphone, this is the reason.
Shutter Button - You’ll also see a green light that changes color. When it’s red, you cannot take another photo. When it’s yellow you can take another photo but it is still processing the last image you took.
Settings Icon
Switch Camera - Rotate between selfie and backfacing cameras.
That covers the basic interface items. Remember you can customize these to add other things you might find yourself using often.
Exposure & Manual Shooting
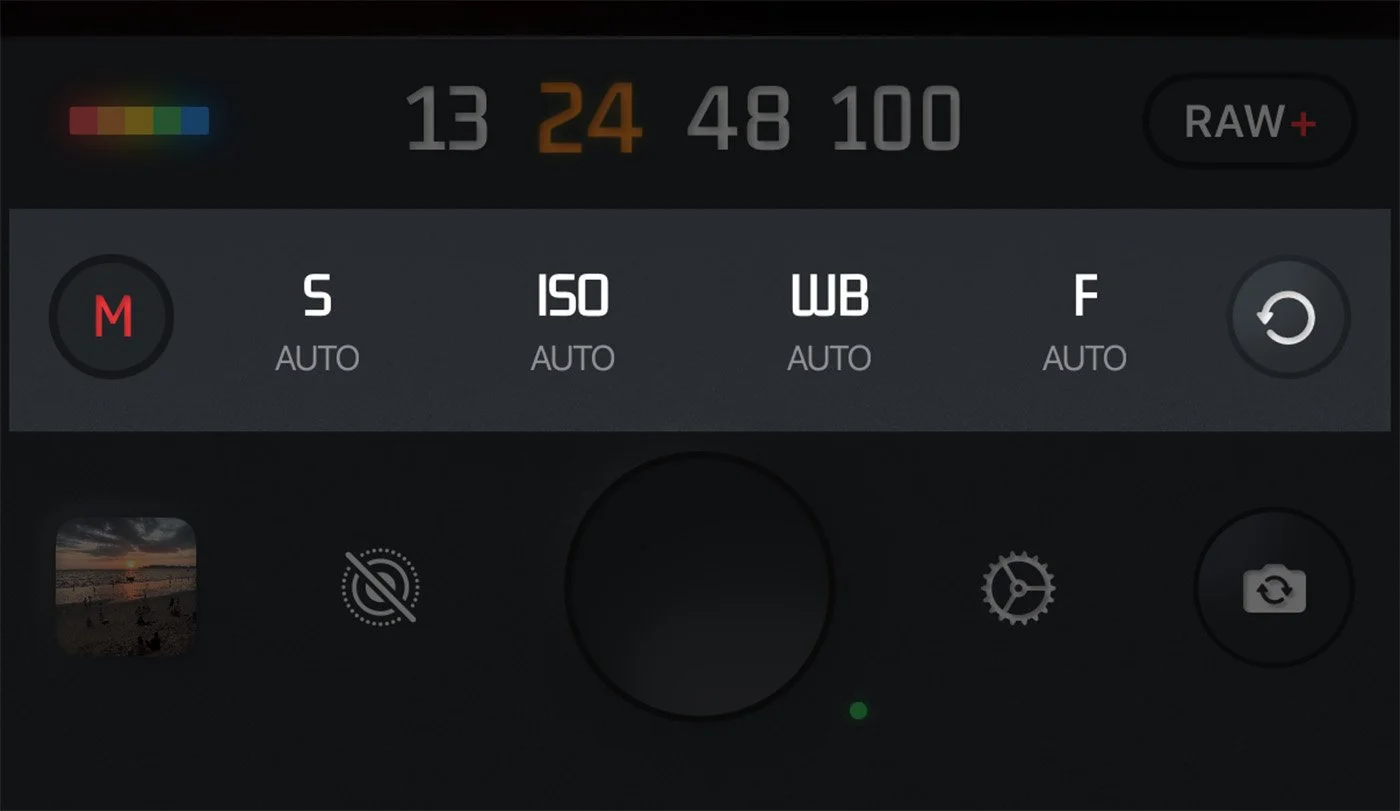
No Fusion Manual Controls
For now we’ll skip down to the “M” (Manual) icon. If you tap this, it’ll bring up settings to manually adjust Shutter Speed, ISO, White Balance, and Focus. While these settings are great to use if you’re attempting to learn more about exposure in photography, I personally never use them for two reasons
When I’m shooting with my Phone, I’m typically on the move and trying to quickly capture a shot. The manual settings rarely matter when photographing with an iPhone. You can’t adjust aperture, which is typically what I’m mainly concerned about when shooting with a larger camera and normally the automatic mode of the iPhone handles everything well enough, outside of exposure which we’ll talk about below
More importantly, manual controls are disabled or don’t function (besides focus) when shooting above 12mp, thus if you’re shooting in MAX mode with 48mp images enabled (Also known as ProRAW), the manual exposure controls are not active anyways. This has been a restriction ever since Apple introduced ProRAW on the iPhone 14 Pro.
tldr- I never use manual when using my phone but I do use the exposure adjustment. To adjust exposure, get out of the manual menu and an “Exposure Value” scale should appear. Simply drag this left or right to adjust your exposure.
A great tip is you can set your volume controls to increase and decrease exposure. To do this go to setting icon > Volume Button Control > Under Short Press > Adjusting Exposure. Just remember that this will disable the ability to snap images with the volume control buttons if that’s what you’re accustomed too.
I don’t think I’ve ever shot at +1 EV or ever gone below -1EV. This is highly dependent on what type of raw pipeline you are using (Bayer vs ProRAW), which we’ll discuss more later. You can reset the EV by double tapping it.
Film Simulations & Effects
No Fusion Effects and Film Simulations
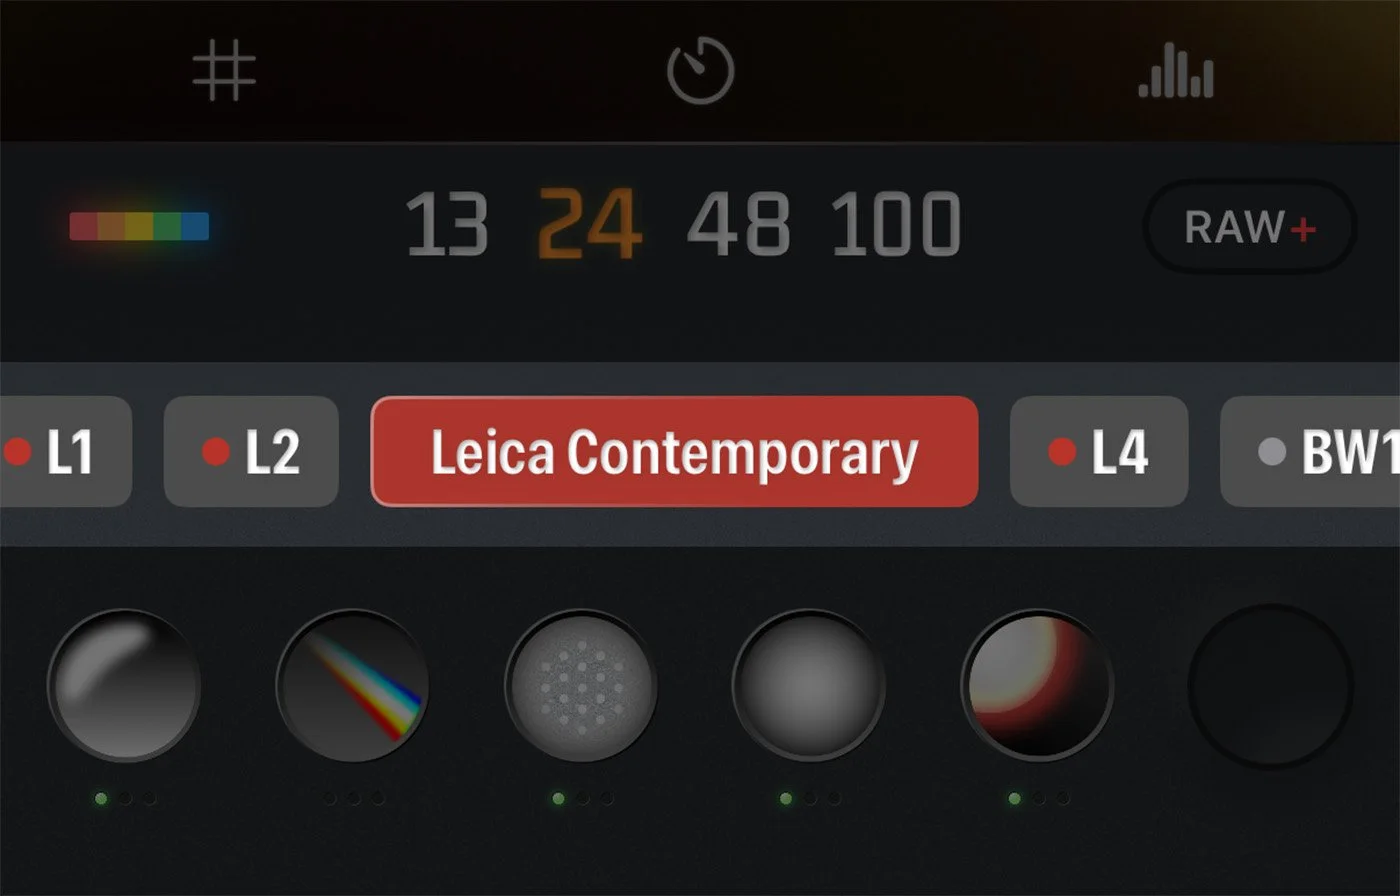
One of the main reasons to use No Fusion is the built in film simulations (filters) and effects. Lets cover the film simulations first. There are two ways to access these by default.
Change film simulations by swiping left or right in the camera viewfinder window - this works when you have the the filter effects menu opened (this is the rainbow icon in the default theme) or when you have the exposure window open.
With the effects menu open, you’ll also see icons such as “G1, G2, K1, K2,” etc. You can choose between the film simulations here. Secondly in this menu if you tap on a simulation after selecting it, it will tell you the full name of the simulation. For example “NN” is “Fuji Nostalgic Negative.”
When you have a filter selected, you can long press anywhere in the camera viewfinder window to see the image without a filter, similar to turning the filter on/off to see what it is doing.
Changing Film Simulation Intensity
While you can change the film simulation intensity in editing, I much prefer to do it when I’m out photographing. To do this we’ll customize our setup to add this functionality to swiping up and down within the camera view finder. To do this navigate to the setting icon > Quick Slider > Selected “Adjust Filter Strength” under Vertical Quick Slider.
With this enabled, you can just swipe through different film simulations going left or right, and then adjust the intensity of those simulations by swiping up and down. Personally I think this should be on by default but maybe some users have issue with both swipe axis adjusting settings. My advice is to give it a try and if you don’t like it, disable it!
This has been an important upgrade to my workflow using No Fusion as many times a filter is just a tad too strong or I like what a filter is doing but it might be de-saturating an image too much. This gives you more granular control while still remaining quick and accessible.
Effects
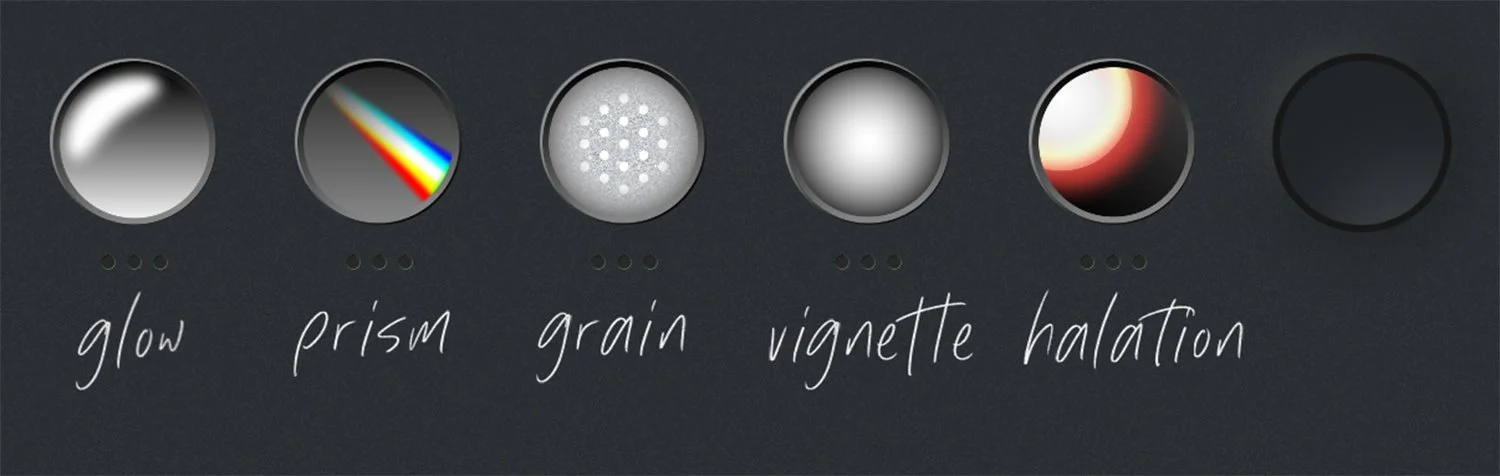
No Fusion Effects
The other options that come up with you open the filter menu (rainbow icon on default theme) are 5 different icons (this might be 4 icons if you’re on an older version of No Fusion). These 5 Icons adjust: Bloom (glow), Prism, Grain, Vignette, Halation. Lets break down what each of these do and I’ll also recommend the settings I tend to use the most. Keep in mind these are my preferences and ultimately are to help avoid the “phone look” while not looking too artificial.
Bloom (Glow)
recommended intensity: 1
This effect will add a bit of glow to your image, similar to what a black mist filter will do, although the effects can be a bit more intense on No Fusion. In No Fusion’s current implementation it seems to bloom shadow areas more than I’d prefer, however I still tend to use this setting to help “soften” the iPhone images, but I rarely go over 1 intensity.
Prism
recommended intensity: 0
This mimics the look of vintage lenses, creating distortion on the edges of the frame. Personally I don’t use effects like this normally but I do think the implementation is tasteful if thats the type of photography or look you’re going for. Im simply recommending a “0” on this because I don’t use it.
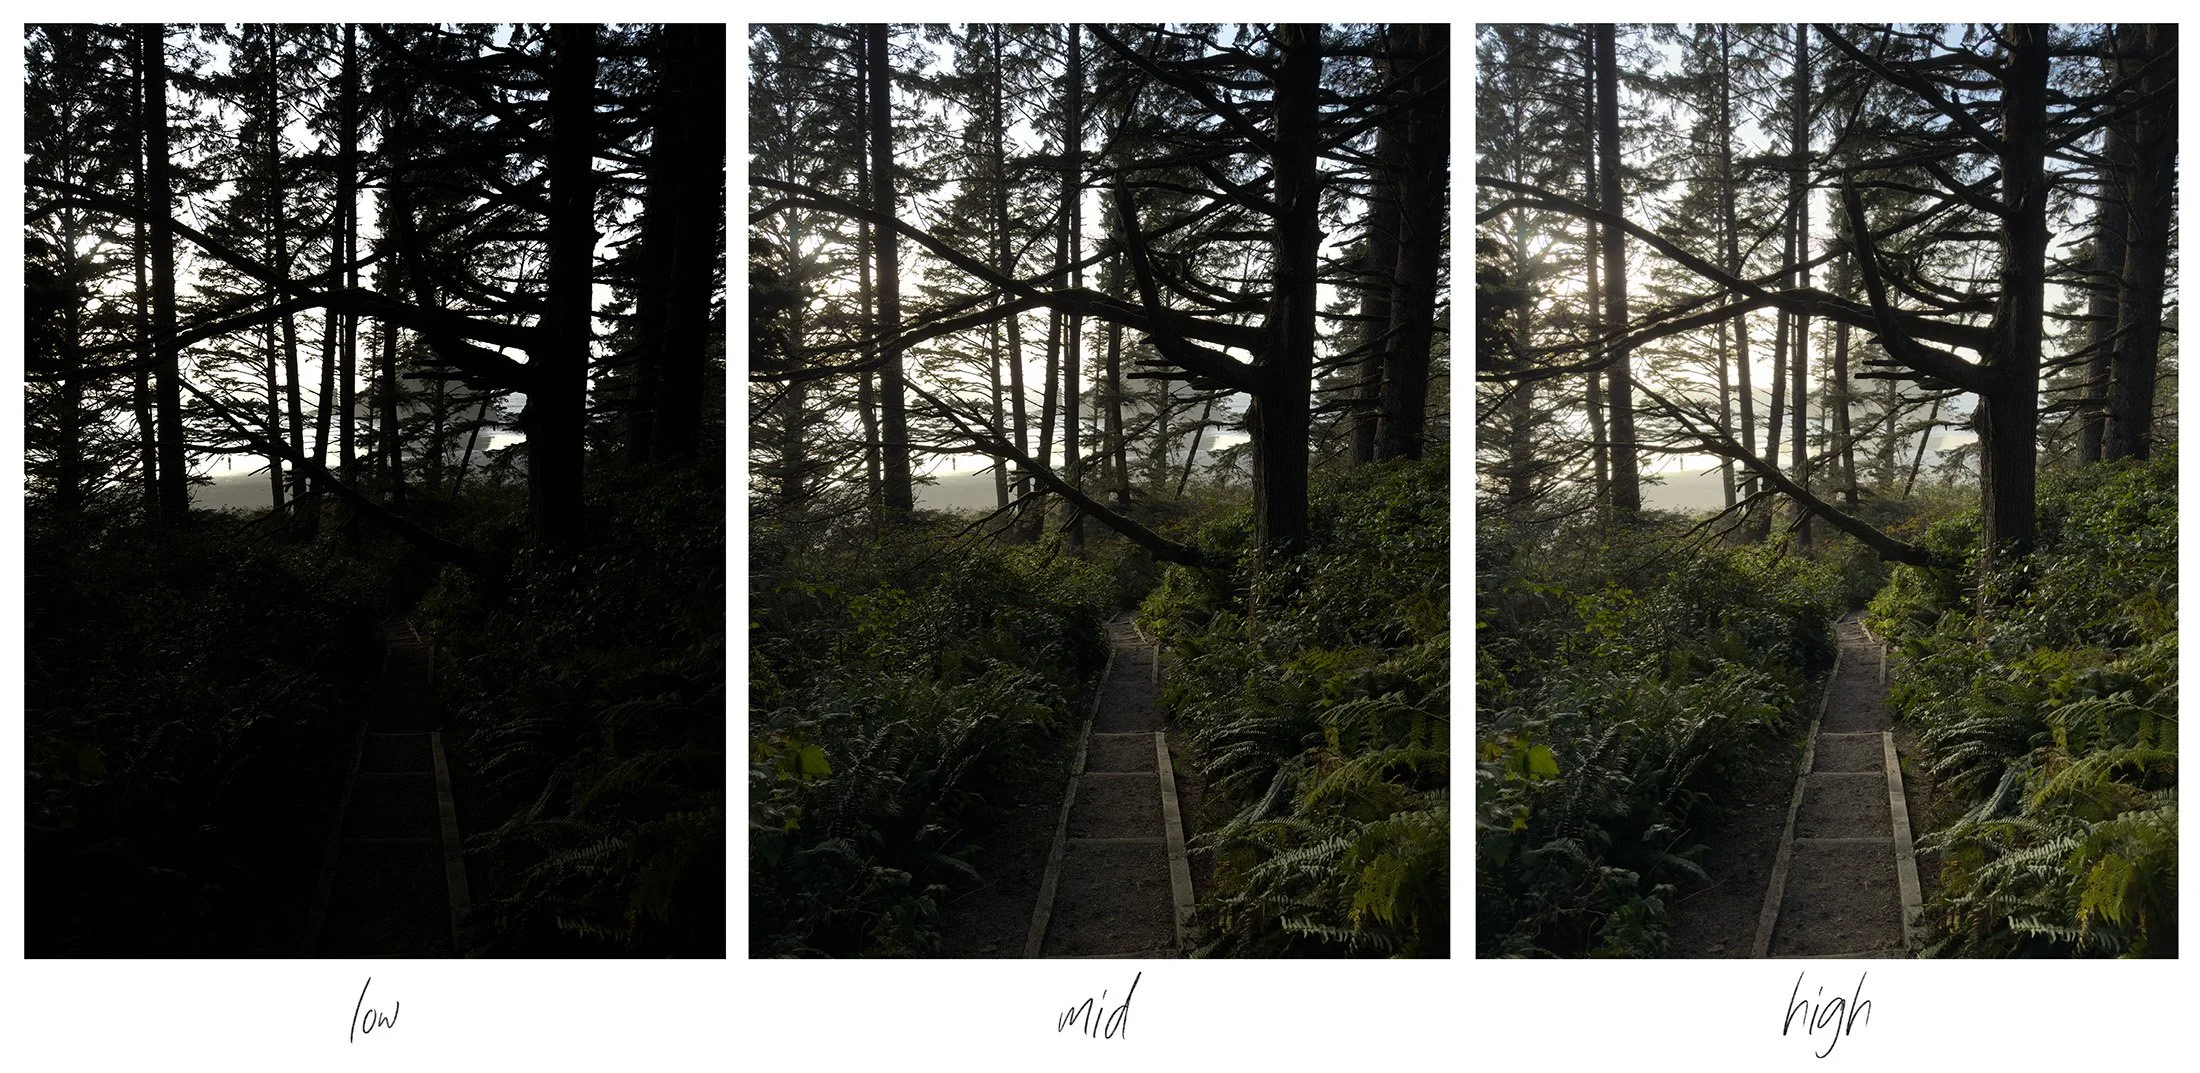
Grain
recommended intensity: 1-2, sometimes 3
This is one of the better settings to remove the intense over sharpened look that the iPhone produces. The look is quite subtle, especially when you’re utilizing 48mp images, thus I’ve zoomed into the example images here so you can see just what is happening, but remember if you’re mainly posting these on social media or in small screen consumption then you can utilize the full intensity because it can be hard to notice on smaller screens.
Vignette
recommended intensity: 1-2
Vignette is a classic editing technique to help draw attention to the center of the frame. I almost always shoot with 1 intensity set, unless I’ve got a lot of sky in the image and it becomes more apparent. I could easily see pushing this all the way to the 3rd intensity in the right moody setting. You can see even in the example image that it can work, but my personal preference is to keep it between level 1 and 2.
Halation
recommended intensity: 1-3
Halation is an effect that occurs in film photography that creates bright red/orange tones near highlight edges. This effect is very similar to Bloom but only seems to impact highlight areas. This was recently introduced so I have less in the field time testing it, however I really enjoy the results of it and wish the bloom filter worked similarly, impacting the highlights more than the shadows.
One thing to be careful of is using bloom and halation in the same image with too much intensity. Considering these do similar things, especially in the highlights, I could see it getting too strong very quickly. Currently I’ve been applying halation first and leaving bloom at a max of 1.
The nice thing about this effect is that even at it’s most intense in some scenes, it’s not obvious. The more highlights you have within the image, the more this effect will appear. Notice how its very clear in the glow of the trees but not visible at all in the shadows.
RAW, HEIF, HEIF+, and Negative Film
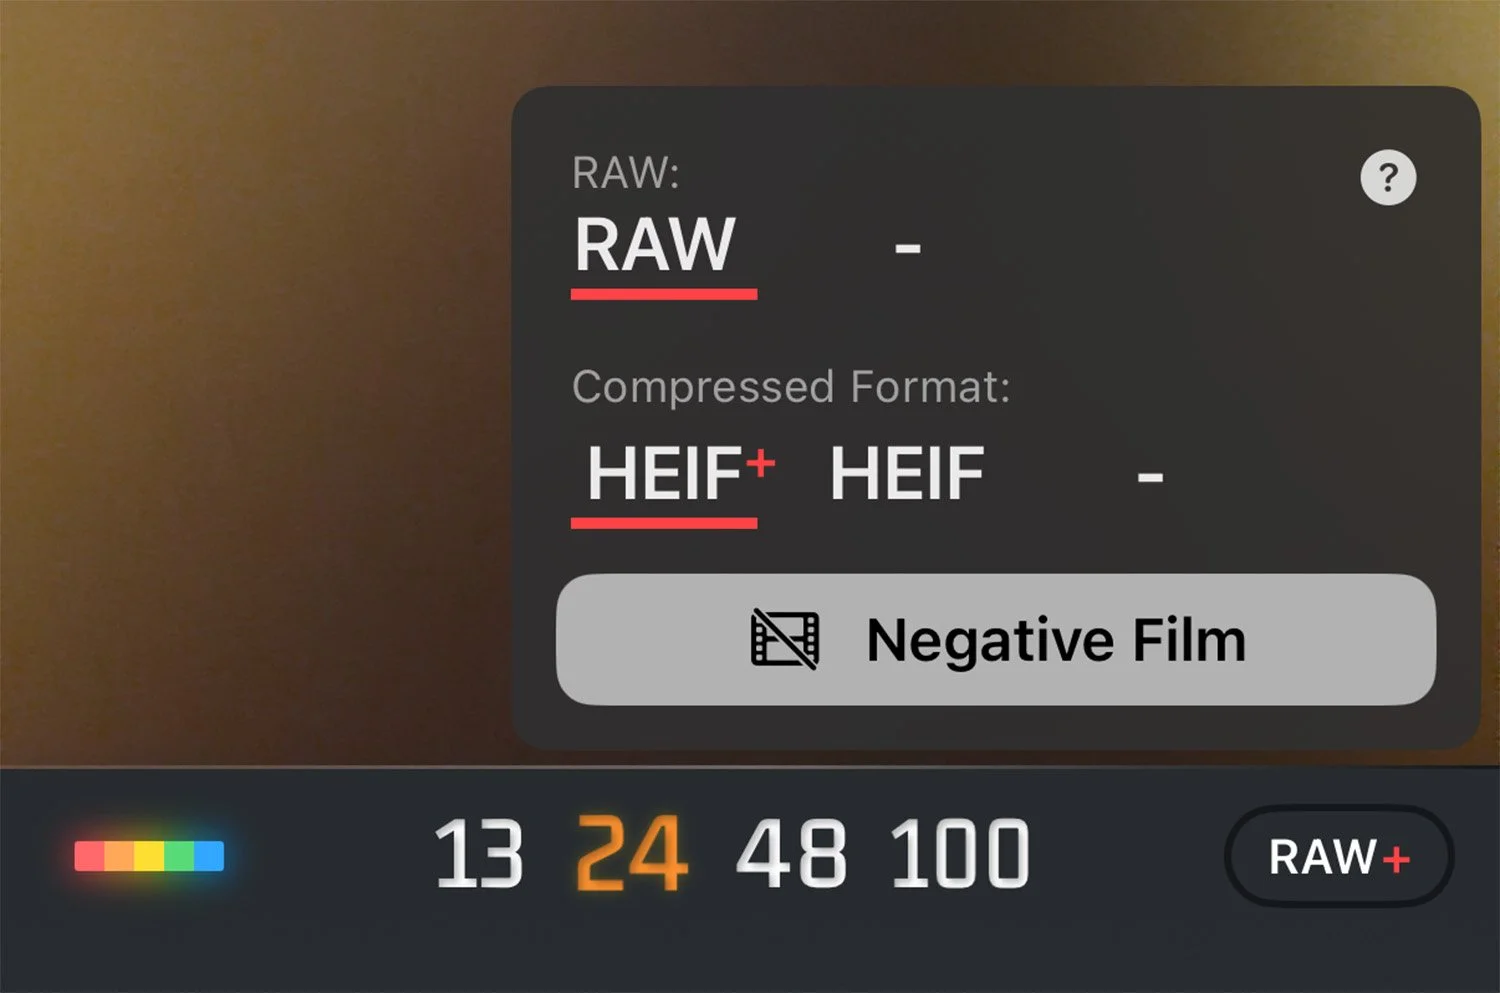
Image Quality Selection
Alright this is where things get a bit more technical but also where the app really shines in terms of setting itself apart from many of the other photo apps for image quality. Personally I think some of the options here could be cleaned up a bit to not be as confusing so I’m going to do my best to breakdown things as simple as possible. Also keep in mind that I have no inside knowledge of No Fusion and I am doing my best to interpret my understanding of what is happening for each setting.
RAW Capture
This is pretty simple. You essentially have two options: ProRAW and Bayer RAW.
ProRAW is Apple’s pipeline for capturing high dynamic range, detailed images. Within this process they combine multiple exposures to capture more dynamic range while also de-noising and sharpening the image, plus other things. This format is also the only option for capturing 48mp images using the quad-bayer sensor on each of the appropriate cameras (All three cameras as of the iPhone 17Pro have quad-bayer sensors). You won’t be able to capture 48mp images on iPhone cameras that do not support 48mp raws. For better low-light performance, use ProRAW but disable “MAX” to shoot 12mp ProRAW images.
Bayer RAWs bypasses Apple’s processing (as much as you can at least) thus resulting in less dynamic range and limit you to taking only 12mp raws. Bayer RAW is the same process that Halide uses for it’s “Zero Processing.” If you use this pipeline, the preview image and resulting raw capture may differ. These will have more noise and less dynamic range.
note - If you don’t have a “Pro” model iPhone, you will not have access to ProRAW capture, thus you’ll only have Bayer RAW as an option.

To choose your raw preference, select the setting icon > Advanced Settings > RAW > RAW Pipeline Type
Personally I utilize the ProRAW pipeline to get the most dynamic range and detail within my images. From my testing, a 48mp raw taken in No Fusion using the ProRAW Pipeline is very similar to taking a ProRAW 48mp image in Apple’s native app, but has less sharpening applied which is exactly what I want.
If you’ve decided to use ProRAW, you’ll want to enable the “MAX” setting when shooting to capture 48MP raw images and disable it to capture 12mp, non quad-bayer sensor images which tend to perform better in low light.
HEIF and HEIF+
If you’re unfamiliar with HEIF (also known as HEIC), it’s essentially like JPEG compression, but with more modern methods that allow for more information. You can think of this like shooting JPEG on a mirrorless camera, just with a different file extension. If you want more info, this article is fantastic. While HEIF has lots of upsides to JPEG, the biggest downside is simply that it’s still not a universally accepted format like JPEG is, thus you might find yourself having to convert your HEIF images to JPEG, which if you’ve been using an iPhone for the past several years, you have likely already experienced.
HEIF is very simple in No Fusion. This uses Apple’s default processing including over-sharpening. This is essentially like using Apple’s default camera app but allows you to utilize the film simulations and effects of no fusion. I never use this format.
HEIF+ is one of the things that makes No Fusion special. From what I understand, this is essentially just a pipeline of taking a raw image and converting it to a compressed HEIF, all when you press the shutter. This is what allows you to take 48mp HEIF images that most other camera apps don’t have access too. Keep in mind that if you want to take 48mp HEIFs that you must use the ProRAW pipeline which we’ll talk about below. The reason this format is great is because it allows you take less-sharpened, great detailed, less “Apple-processed” 48mp images that are ready to be shared to friends, socials, etc.
HEIF+ Calibration
When you take raw images, theres a lot of data within the shadows and highlights that you can recover, typically a choice made in editing. However if you’re intending to skip the editing and utilize the HEIF+ format in No Fusion, then you have to decide a few processing choices for the conversion from raw to HEIF+ (remember my theory is that HEIF+ is simply No Fusion taking a raw image and processing at the time of you pressing the shutter).
To access this menu go to the setting icon > Advanced Settings. You’ll see a few settings to cover:
HEIF+ Latitude Settings
Sharpness - Not much to say here, I have this “OFF.” Can always add more sharpening later and even with everything off, the images are plenty sharp. Half the reason we are using No Fusion is to bypass much of the sharpening
Latitude - This is a big impact on your images. Above is all three settings utilizing a ProRAW Pipeline. If you choose to use BayerRAW, this setting won’t have as much latitude, this you’ll notice more subtle differences. I change this setting between “Mid” and “High” - Defaulting to High
Saturation Compensation - As of writing this, I’m not sure this setting is working. Regardless if I’m in Bayer or ProRAW, changing the setting doesn’t seem to impact my images or saturation of colors.
RAW Pipeline Type - This essentially determines how your HEIFs are made. If you prefer the BayerRAW look and limit of 12mp images, choose that. Personally I utilize ProRAW to capture more dynamic range and 48mp images. Note that if you have “MAX” selected when shooting but utilize BayerRAW, it will always be 12mp. I wish the MAX would be un-selectable or disabled if your current pipeline cannot take 48mp images.
Exposure Baseline - I personally have not had to change these but if you notice your images not matching the preview exposure before you capture them, adjust accordingly here.
tldr: Sharpness OFF, Latitude MID/HIGH, Saturation Comp - NULL, RAW Pipeline - ProRAW
Negative Film
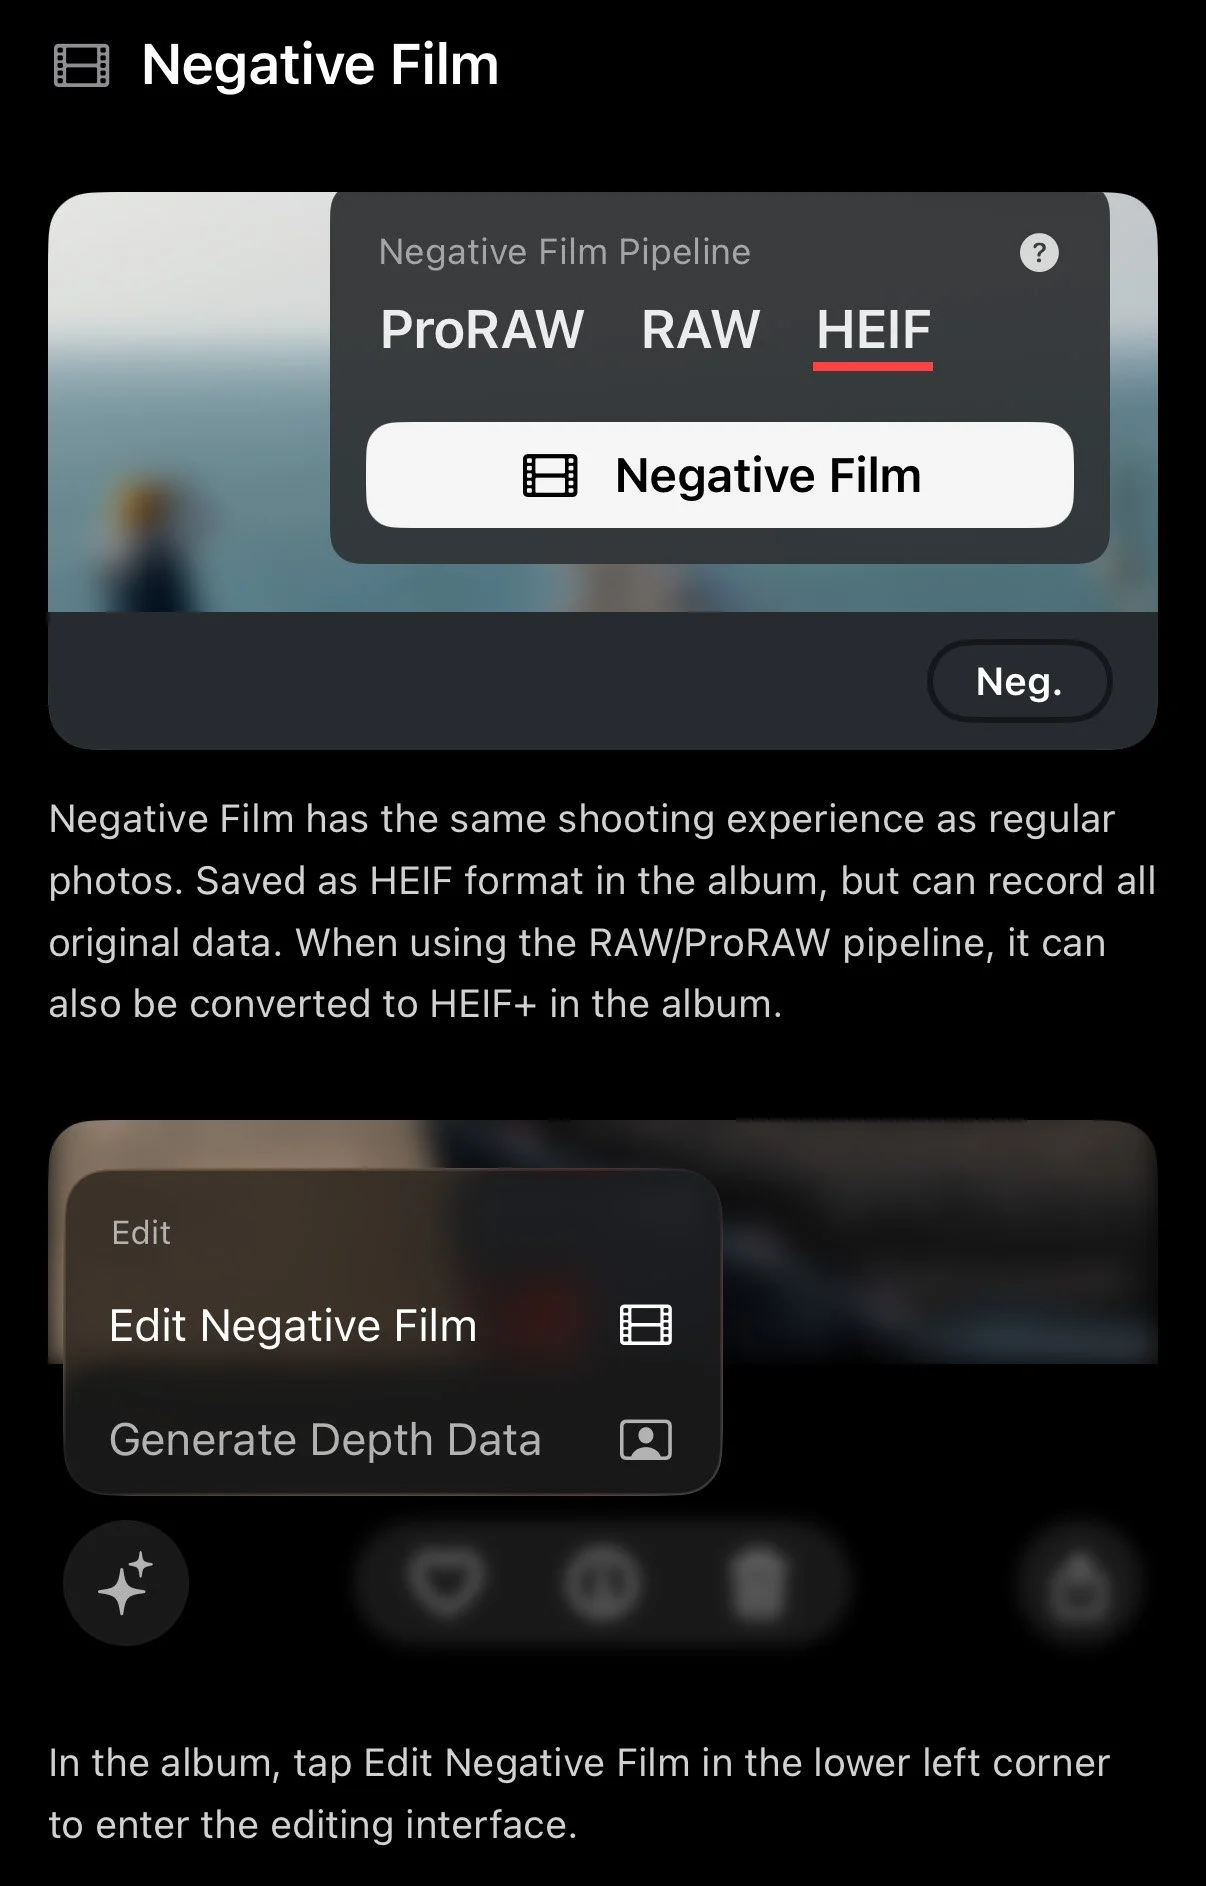
This allows you to capture images and re-edit them with different effects or film simulations if you want too. These edits of course have to be done within the app. You can do this by navigating to the photo library within the app > Tapping the Star Icon > Edit Negative Film. When you select “Negative Film” while shooting you’ll have three options, ProRAW, RAW, and HEIF. These are the three pipelines we’ve covered above (HEIF being Apple’s processing). I recommend ProRAW.
Another benefit of using Negative Film is that it allows for faster capture times and less battery drain (especially on older phones). Essentially you’ll capture the full image and original data, but they won’t be combined or processed yet as a HEIF+ (which removes the “Apple Processing” look), thus you’ll still need to do that for any negative film images you take. You can batch process them within the photo library view by selecting all the “Negs” you’d like to convert and tapping the ellipses icon in the bottom left corner to convert to HEIF+.
Personally for my use case, this setting has become less necessary to worry about now that No Fusion allows you to convert raw captures into images you can edit (Negative film). Thus for me, I never use this setting. If I don’t intend to edit or change the film simulation, I only shoot in HEIF+. If I’m unsure and might want to edit the photo (wether thats a larger edit in Lightroom or simple effects change in No Fusion), I enable RAW when shooting. I can later turn the raw to a “Negative film” image and edit all the setting within No fusion. Keep in mind I have the latest iPhone and don’t spend all time snapping photos, so I don’t worry that much about battery life.
fun fact - you can actually convert Raw images you took with other camera apps (Apple camera included) into Negatives and add No Fusions processing to them!
Photo Size
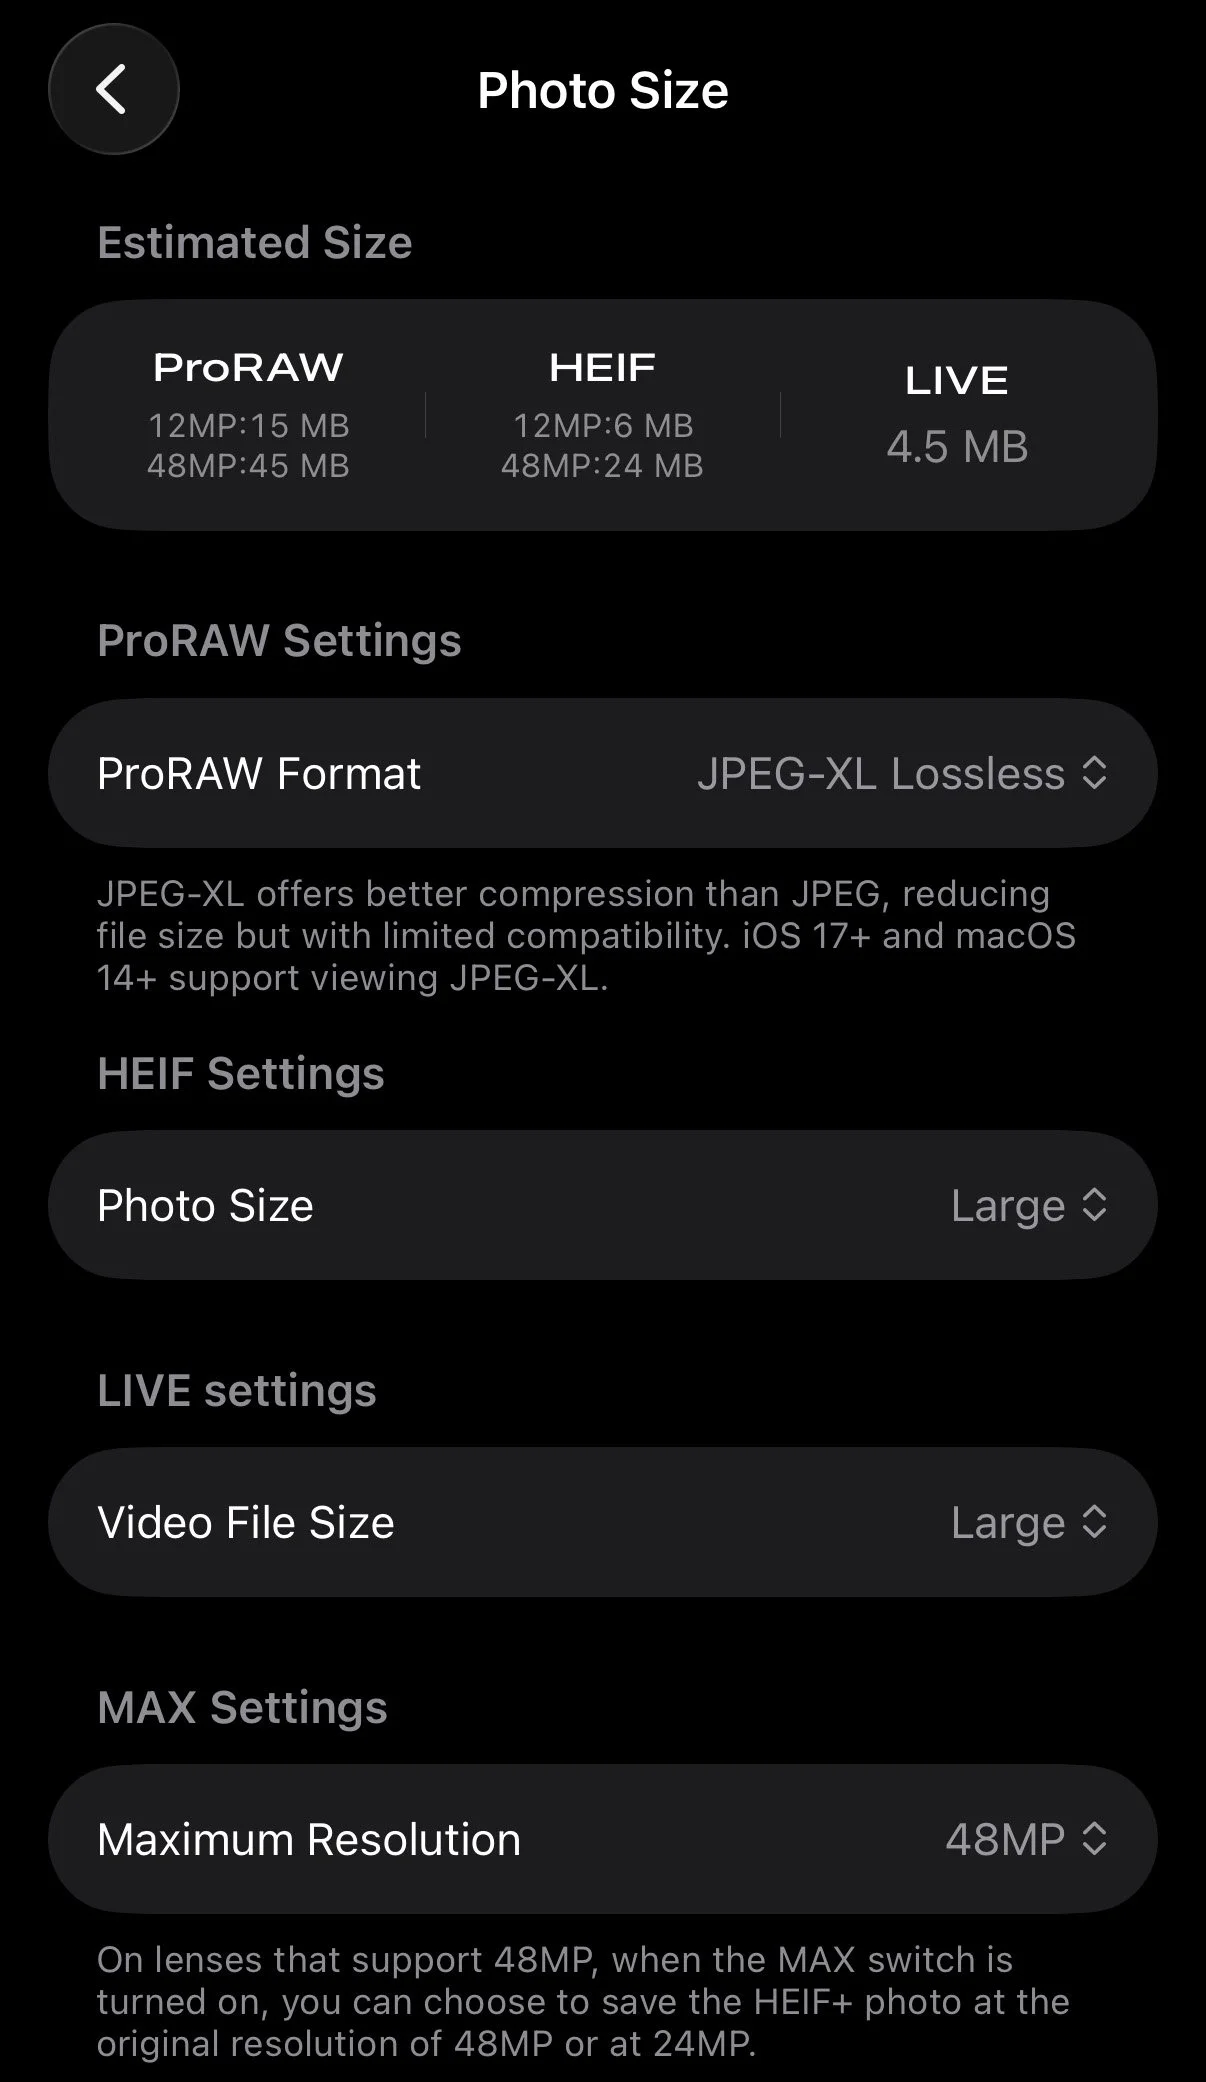
One of the last quick settings to adjust is your photo sizes. Navigate to setting icon > Photo Size
ProRAW Format - This is where you can change the compression methods for the raws that get captured by the iPhone. If you’re unfamiliar, all raws (Apple native app, apps like Halide or No Fusion) use some form of JPEG compression with a .dng container. When the iPhone 16 Pro came out, they added JPEG-XL compression which is my recommended setting to use for this format. Specifically JPEG-XL Lossless but Lossy is also absolutely enough if you like to save more space.
HEIF Setting - I select Large for least compression, just note down the file size changes at the top when selecting.
Live Setting - I don’t typically enable live photos but I leave this at Large.
MAX Setting - This determines if you’ll take 24mp or 48mp images when you select “MAX” in the view finder window. Remember that if you’re using a BayerRaw pipeline, this setting doesn’t matter. 48MP for me
Custom Film Simulations & Installing LUTs
I’ve found that I don’t use a lot of the Film simulations in No Fusion (or most cameras for that matter) considering I like certain aesthetics and looks within my images. One of the best features of No Fusion is that you can customize and create your own looks, plus you can import LUTs similar to the Lumix camera system.
Lets start by simply customizing or creating your own Film Simulation. setting icon > Stylization. Within this menu you’ll see all the built-in simulations. Something to note here is that you can hide/show and re-order any built-in preset by selecting “Edit” in the top right corner. This is something I likely should have done awhile ago considering there are quite a few I just never use!
Creating your own Film Simulation
Once you’re in the stylization menu, if you select “Add New Preset” you can either tweak an existing preset as your baseline, similar to creating a recipe utilizing a film simulation on Fujifilm cameras. You can also start from scratch. The adjustments aren’t that in depth and are similar to what you’d find on most photo editing platforms. This includes: Exposure, Contrast, Blacks, Shadows, Highlights, Whites, Color Temperature, Color Tone (Tint), Saturation, Vibrance, and Lastly HLE values for your standard 8 colors.
My suggestion if you got this route is to use or tweak one of the existing simulations to your liking. This will likely save you time and give you overall better results than trying to start from scratch.
LUTs
The best way I’ve found to creating your own film simulation (or recipe) is to utilize a LUT. If you’re unfamiliar with a LUT, you can read more about them here. The confusing part is that LUTs are typically used in video production workflows rather than Photography. 99% of the time, the LUTs you’ll find online are meant for workflows in Rec709 or BT2020 (both video color spaces) and won’t necessarily work how you’d like for photos.
The best way I’ve found LUTs that are developed specifically for Photography is by searching for “Lumix Recipes.” This is because Lumix cameras allows you to import LUT files to create something similar to film simulations or recipes that you’d find on Fujifilm or Nikon cameras. Thus there is a growing community of people out there creating LUTs for their Lumix cameras that you can find and try out for yourself right in No Fusion.
To do this, find a LUT you want to try (I’ll have a pack of 5 Presets down below you can try). Download it on your phone. I downloaded mine into a folder called “FilmLUTS”
In No Fusion navigate to setting icon > Stylization > Add New Preset > Blank
Select LUT > Load LUT > Find the LUT file you previously saved
Done. You can also make adjustments to the Preset utilizing the LUT as a baseline. Then Save it as a Preset (top right corner)
One thing to keep in mind here is that the LUTs you find online, especially for the Lumix systems likely won’t produce the same or identical results. Color, processing, and sensors all matter for these results, so you may have to tweak certain settings to get the results you’re looking for. You’ll also find that many LUTs flat out don’t work or look good on Apple sensors. Regardless, using a LUT can be a great baseline.
Download My Preset Pack!
I recently went through this process and started tinkering with creating my own presets for No Fusion. I tried to build off of a few foundational LUTs I found online while also mimicking some of my own favorite recipes on systems like Fujifilm or Nikon. The preset’s names don’t accurately match the film they are named after 100%, but I did try to get the overall look.
Phone processing on images is vastly different than cameras, for example getting a “warm” look for a particular preset without it making the entire image orange can be hard. Some of these are still a work in progress and I encourage you to tweak them however you’d prefer for your own work. Secondly there’s definitely a couple I use in many more scenarios than others, but sometimes you want a specific look and you have access to it!
Adapted Creator Credit: Rossandhisjpegs | Yahia Angelo | Stephan Morais
These are completely free but I do ask for your email, simply to help develop my email list. I’m lucky if I even send one email a month and you can unsubscribe anytime.
To install:
Download the zip file and open it (unzip it) to your iPhone’s file system, noting where you’ve saved the folder
In No Fusion navigate to setting icon > Stylization > Next to the “Edit” button in the top right, click the download looking icon > Select files to batch import > Navigate to the folder you saved the presets and select all of them to import
Thanks for reading - if you enjoyed this and want to support my work. Consider joining my newsletter, purchasing a camera guide, leaving a comment, or just throwing me a cup of coffee below.